
How to make matching pillowcases - Burrito method
I made two matching pillowcases for my boys using these cute Star Wars Halloween fabrics by Camelot Fabrics.

I thought I was going to make tote bags for Trick-or-Treating but they didn’t want to bring tote bags and wanted to bring just pillowcases... Tote bags are not cool to carry for the boys?! I don’t know why but it didn’t stop me from making things for them! I made the pillowcases instead!

Here is what you need to make two matching pillowcases.
Fabric A - (1) 1 yard (for main and cuff)
Fabric B - (1) 1 yard (for main and cuff)
Fabric C - (2) 2” x WOF (for trim - Optional)
1. From each Fabric A and B, cut ¼ yard (9” x WOF). This is the cuff part and the rest of the ¾ yard cut is for the main part.
2. Place the cuff Fabric A (¼ yard cut) with the right side up, then layer the main Fabric B (¾ yard cut) onto it with the right side down with lining up the law edges and use the wonder clips (or pins) to hold the pieces.


NOTE: Fabric C (trim) is optional. Press the strip for trim in half. Then layer the trim piece before adding the main fabric in Step 2. The trim piece should be between the cuff fabric and the main fabric.
3. Take the bottom of the main fabric and roll it toward the top.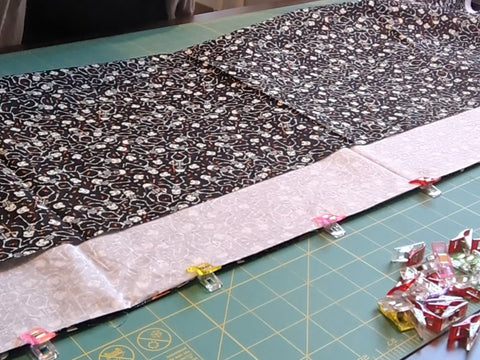


4. Then take the bottom of the cuff fabric, wrap it over the rolled main fabric, line up the raw edge and re-clip (re-pin). It should look like a burrito!


5. Sew the raw edge with ¼” seam allowance.


6. Now take the inside out! Press the cuff from both sides. Trim the salvages.


NOTE: I personally prefer to sew with ⅛” seam here but you can sew the raw edge with ¼” seam and trim the seam down to ⅛” later or leave it with ¼” seam.


8. Take the wrong side out and press. Make sure to push out the corner.
9. Pin and sew the pieced side and bottom using ¼” seam allowance. If you have ¼” seam in Step 7, sew using ½” seam allowance.

10. Take the right side out and press. Now you have approximately 21” x 30 ½” pillowcases.
NOTE: Using ¼” seam allowance in Step 7 and ½” seam allowance in Step 9 makes approximately 20” x 30 ½” pillowcase.

11. Repeat Steps 2 through 10 to make another pillowcase using the cuff Fabric B and the main Fabric A.

My boys had a fun night Trick-or-Treating and I was glad that they brought these pillowcases with them! Now I will wash them so that they can use the pillowcases in their bed!


Here is the Instagram reel I posted making the pillowcase.
I hope this tutorials is helpful to make your pillowcase(s). Happy sewing!